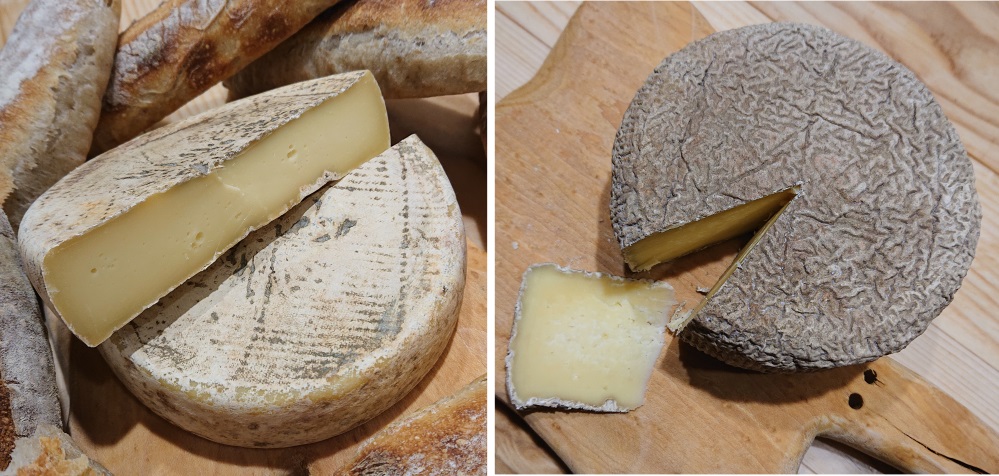
 Two homemade tommes. Aged three months (left) and ten months (right).
The term tomme, also written tome, is a French word which origin is not very clear. It designates a sort of cheese made from curd. In practice, this cheese is generally a medium sized and round-shaped cheese often made at farms in mountainous regions. This cheese can be made with milk from cow, sheep or goats, or a mix of these milks. A tomme can weight from about 100g like the tomme de Saint-Marcellin to several kilograms for the tomme de Sospel (between 9-12kg).
Depending on the regions, the type of milk and the ripening conditions, the tomme may have very different aspects. It can be more or less firm. The rind color comes in different flavors, from white to grey, with different thicknesses. The picture below shows diverse examples of tommes coming from different regions from France.
 Example of tommes from different areas3.
This diversity is a good thing for us, home cheesemakers. Indeed, that means we cannot really be wrong when making a tomme as there is not one single possible result! This leaves some room for interpretation and to make a tomme that is going to be adapted to your own environment.
The recipe of the tome fraîche to make aligot is given in this article. The recipe to make homemade aligot is also given here.
Follows a recipe to make a tomme at home. This recipe worked for me in Boston, that’s why I called it the Bostonian tomme. However, depending on your milk, your ferments, your ripening conditions, your result may be different. But that’s totatlly fine! This will be a tomme that reflects your place!
Please note that this recipe is largely inspired from the Alpine-style tomme given in David Asher’s book.
Ingredients
For a tomme of about 700g (after aging 3 months):
- 8 L of milk, preferably the freshest raw milk (non-homogenized)
- ~80 mL of clabber, kefir, or whey from a previous batch of cheese, or other cheese culture
- 3/4 tablet of Walcoren rennet, crushed and diluted in about 30ml of cold water wihtout chlorine (to decrease the chlorine contained in tap water just shake it and leave it rest for a while)
- ~8g of fine-grained salt (preferably sea salt, and without any additive)
Material
- a big pot with a thick bottom (to keep the milk warm)
- thermometer
- a whisk (to cut the curd)
- a ladle
- a big mold (you can make it yourself)
- cheesecloth or equivalent
- a grid or a platter to get the whey from the cheese when draining
For ripening
- a big box with a lid
- a sushi mat or a wooden board (non treated) to put the cheese on
More details about the material.
Duration
- ~2h for fermentation and coagulation
- ~24h for draining
- ~24h for salting + draining
- 2 months to 1 year for ripening (depending on your taste and conditions… and patience!)
Process
Timings are subject to change depending on your material and the quality of your ingredients. Take care of using well-cleaned material (use white vinegar, rinse with clear water and keep it dry in the open air). Wash your hands too!
0h -> ~2h, Temperature : ~32°C -> 40°C
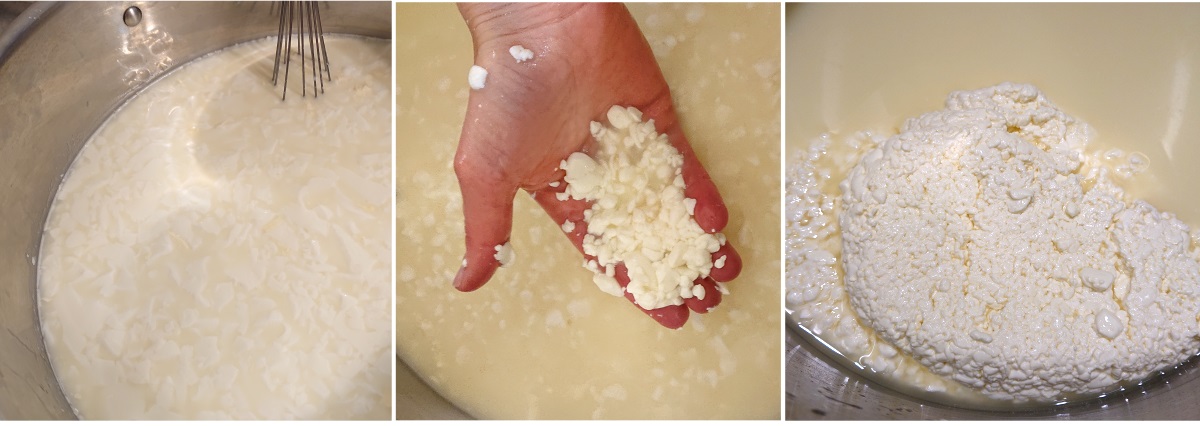
1.Poor the milk in the pot and warm it up to about 32°C on a low heat. Add the ferments. Mix it up well from top to bottom. Cover and let it rest for about 1h.
2.Add the rennet. Mix it up well again carefully. Let it rest for about 1h. Do not move the pot, the forming curd is very fragile.
2.The milk should have now coagulated. If you move a little bit the pot or if you touch the surface, it should fell like a panna cotta. You can check that the curd is ready following the same instructions as in this article. Put your finger in the curd with an angle of 45 degrees and go up to cut the curd. If the cut is clear then the curd is ready. Otherwise wait for another 10-15 minutes and do the test again. If it is still liquid after 3h that means that your milk is not of good quality or that you did not use enough rennet (or it is expired).
4.Once the curd is ready you can cut it. With the whisk break the curd by moving from bottom to top. The curd should be cut into small pieces of the size of coffee grains (see picture below). Once the right size is obtained, mix it with a big spoon. Warm up the pot at low heat to reach about 40°C, while stirring. The heat is helping to extract whey from the curd, and it makes it drier. To know if it is ready to mold, take a handful of curd, close your hand and press it slightly. The curds should stick together. Another sign that it is ready: when you stop stirring, the curd falls to the bottom in a few minutes.
5.When the curd is ready, stop warming up and let the curd come down for about 10min.
 Cutting the curd with a whisk (left). The right size of curd (middle). Curd ready to be molded (right).
6.Extract the whey with a laddle from the top. All the curd should now sit in the bottom of the pot.
7.Prepare your mold (see picture below) with a cheesecloth. Put the mold on a grid with a platter below to get the whey (see picture below).
~+2h -> ~+14h, Temperature : room temperature
8.With your hands, put all the curd together to form a whole. Press it a little bit and put it in the mold (see picture below). Press the curd in the mold with your hands.
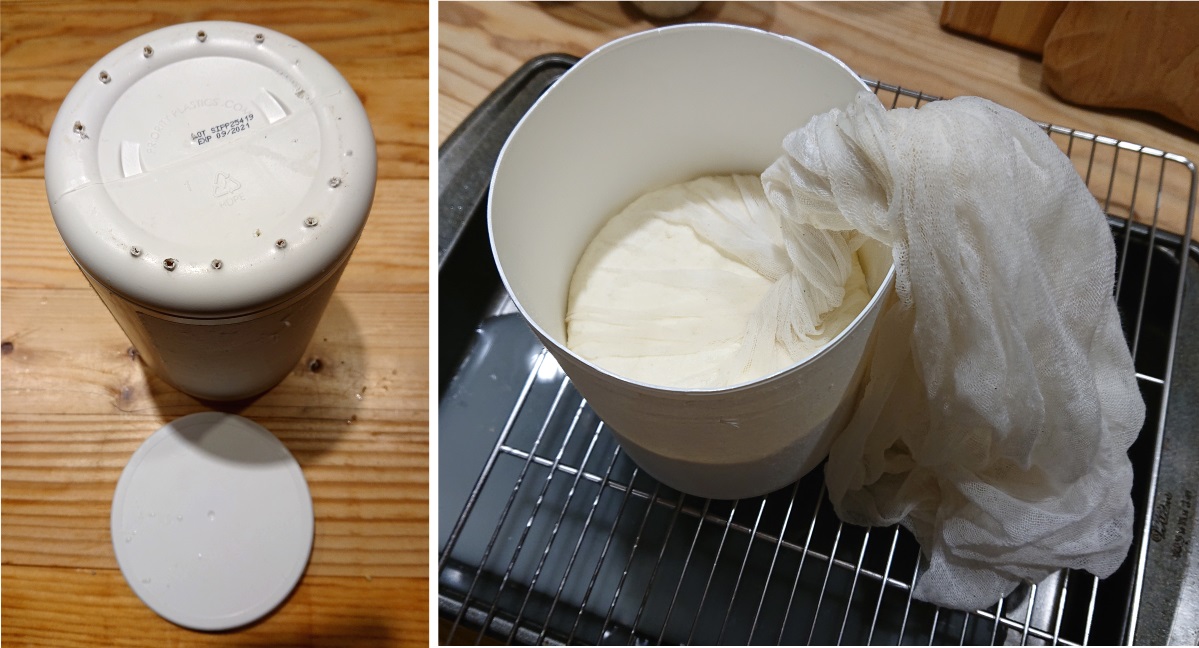 On the right, a cheese mold made from a plastic container (the small holes were made with a screwdriver). On the left, the curd is molded.
9.Flip the cheese and put it back in the mold with the cheesecloth after about 1h, or when the cheese is sufficiently formed. Let it drain for a night (or about 12h), at room temperature (if possible around 20°C). You can flip the cheese several times if possible. This will allow to get a uniform molding.
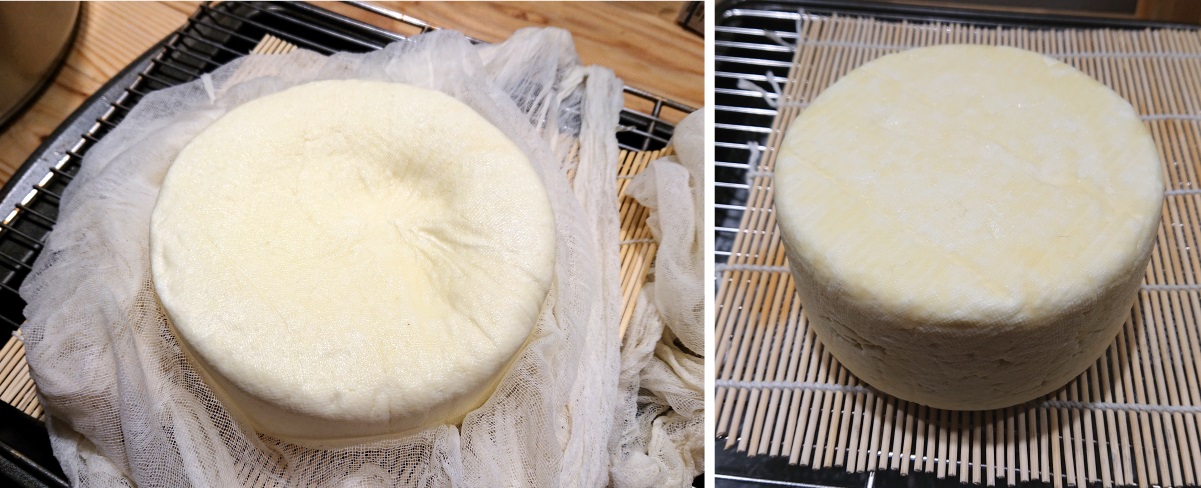 Cheese unmolded. On the left before flipping the cheese, we notice that the cheese is not very flat. On the right, after flipping the cheese, it is smooth and flat.
~+14h -> ~+24h, Temperature : room temperature (~20°C)
10.Salt the cheese by rubbing it with the salt in your hands. Put it on a sushi mat or a grid to make it dry. Let it drain about 12h. In order to create ideal conditions you can add a box on top of it to keep a high level of humidity (see picture below). Be careful that air can circulate and that the humidity does not saturate. Ideally keep it a temperature between 15-20°C. If it is cold outside, you can let the cheese close to a window for instnace. On the contrary, if it is too hot, use ice cubes in the platter below your cheese for instance. Be creative! If you cannot lower the temperature, then shorten the times at room temperature.
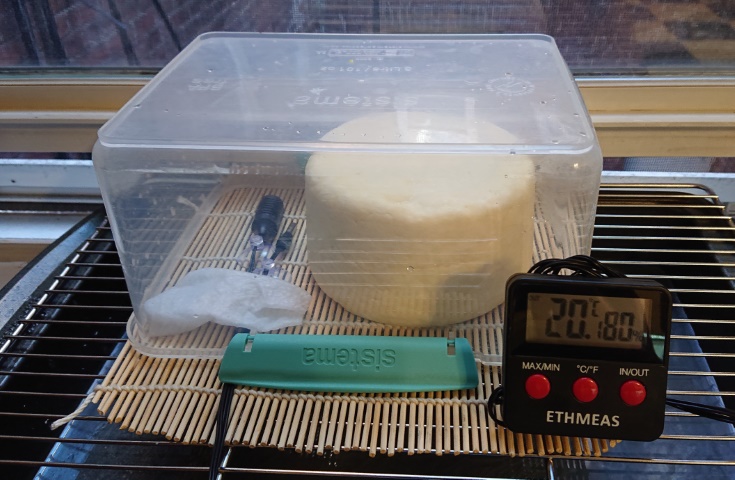 The tomme after salting. A plastic box has been put on to to keep a high level of humidity (we can read 80% on the sensor).
~+24h -> ~+15 days, Temperature : cave or fridge (~7-12°C)
11.If the rind is relatively dry, you can start the ripening process. If you have a small cave with a temperature around 10-12°C that’s perfect. If not, use the top of your fridge which should be around 7-8°C. Leave the cheese on a sushi mat or a wooden board. This will prevent the cheese to be in contact with humidity in the box. Put a lid on top but do not close the box. Air should circulate, especially in the beginning when the cheese is still very humid.
12.Flip back the cheese regularly. Twice a day in the first days and then less frequently. Wipe water from the box regularly.
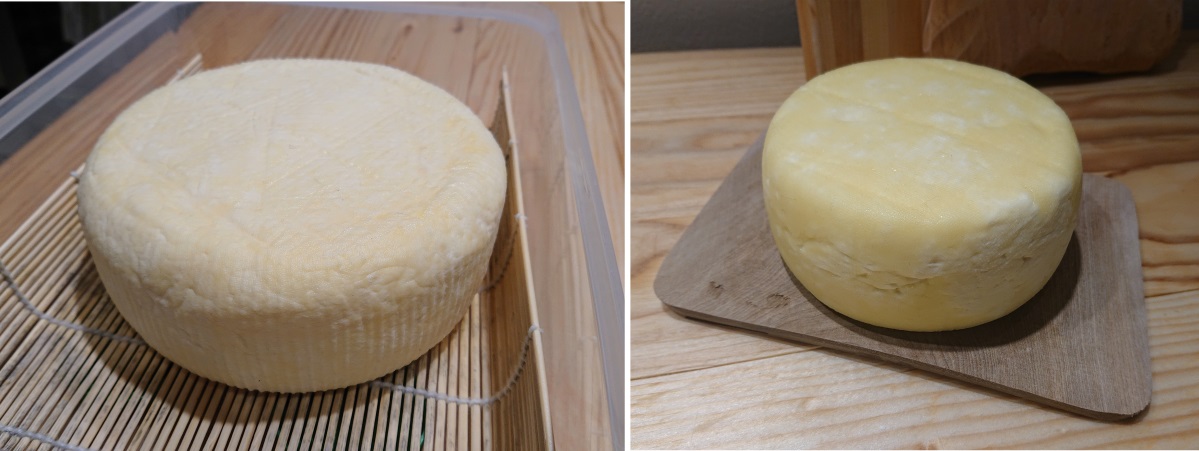 Tommes on a sushi mat and on a wooden board, ready to ripen.
13.After a few days, some mold should start appearing on the rind. These molds can be blue or black molds (like penicillium roqueforti or mucor) or they can be yeasts (like Geotrichum candidum). That’s totally normal! Depending on the milk microorganisms, your ferments and your environment, different micro-organisms can spread and be more or less favored. We can see it on the pictures below. Even in my own place, different molds can develop. In order to slow down their propagation which could give a strong taste to the cheese, we can wash the rind with a light brine.
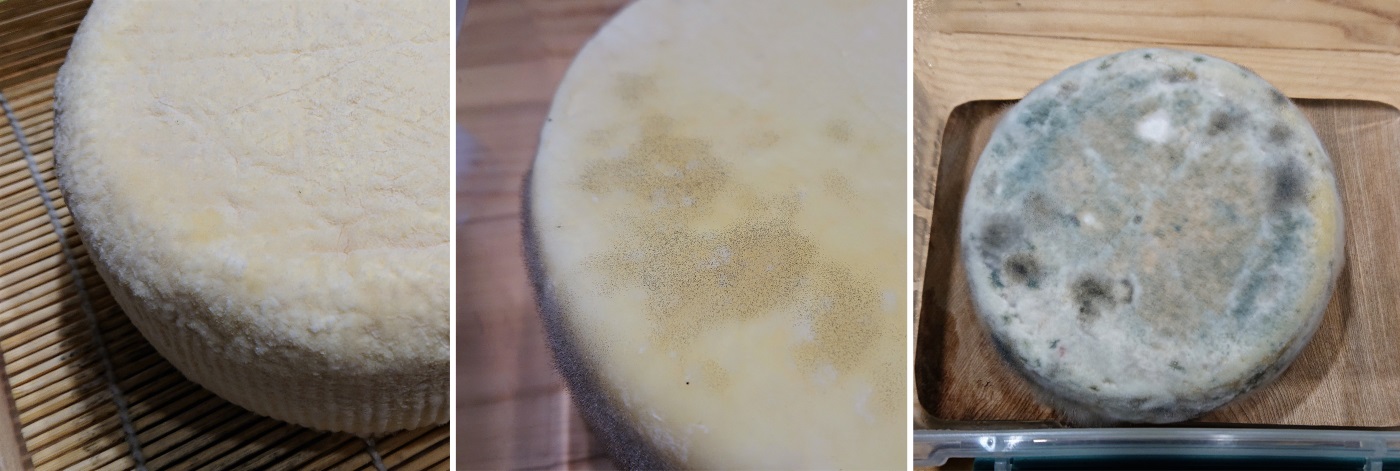 Different types of molds in the first days of ripening (on three different makings).
On the left, we see the white, soft and powdery *Geotrichum candidum (obtained 5 days after salting). In the middle, we see several patches of mucor (obtained 2 days after salting).
On the right, we see many types of molds (10 days after salting, 6 days after washing with a brine). This is probably the result of poorly active ferments.*
Different types of molds in the first days of ripening (on three different makings).
On the left, we see the white, soft and powdery *Geotrichum candidum (obtained 5 days after salting). In the middle, we see several patches of mucor (obtained 2 days after salting).
On the right, we see many types of molds (10 days after salting, 6 days after washing with a brine). This is probably the result of poorly active ferments.*
14.To wash the cheese, prepare a brine by mixing 5g of salt with 100g of water (this is a 5% brine). Damp a cheesecloth in the brine and wipe the cheese. Also clean the cheese support (and dry it). Washing twice in the first two weeks of ripening should be enough. If not, do more washing.
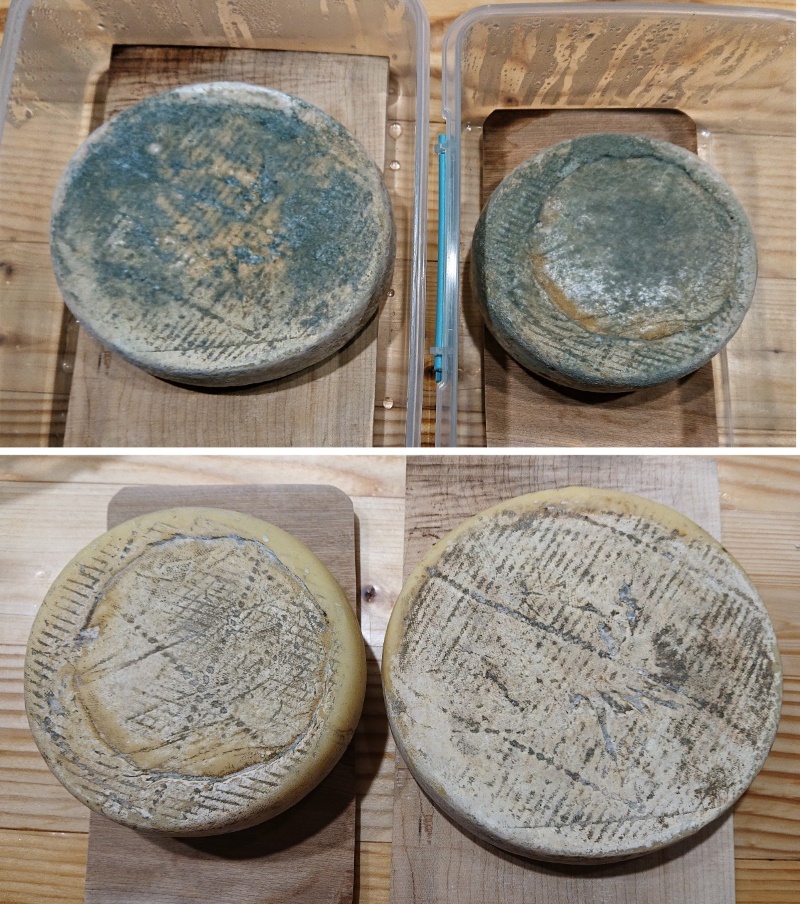 Two tommes ripened about 15 days, before washing. Cold and humid conditions have favored the spread of blue molds.
~+15 days -> 2 months and more, Temperature : cave or fridge (~7-12°C)
15.You can now let your cheese ripen. Check it regularly. Wipe the humidity, brush the rind if needed. (be careful with that very fine dust and cover your face before doing that)
16.After 2 months you can start tasting. This will, of course, depend on your patience and what taste you are looking for. More time will help develop more subtle flavors but the cheese will also become drier. Also take into account that if you ripen your cheese in the fridge at low temperatures, it will take longer to ripen. On the first picture at the beginning of the article you can see two examples of tommes. The first one was aged 3 months at 12°C while the second was ripened about 10 months in the fridge around 6°C. Two different molds were also used.