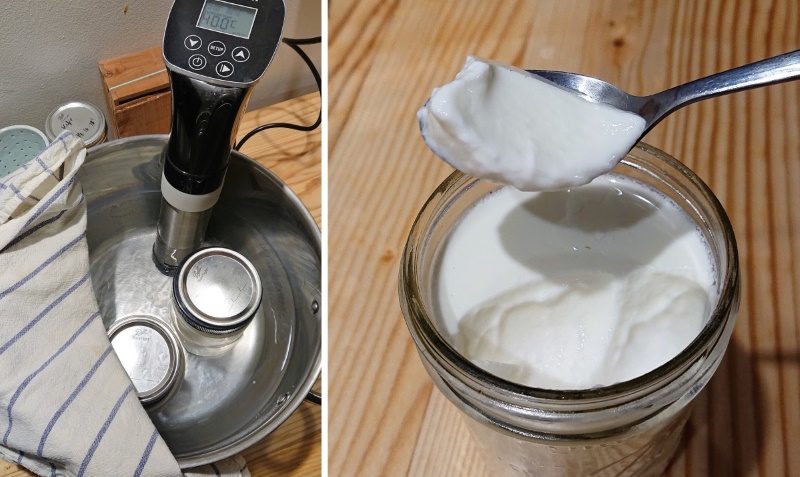
 Left: yogurt making with immersion circulator. Right: my homemade yogurt.
Is it possible to make yogurts at home every week on the long term? Yes! And I will explain how to do that in this article. Only 5 minutes of preparation are needed and very limited material is required.
I see several reasons that could restrain someone to make its own yogurts:
- you do not want to buy a new kitchen device for one single purpose. It’s expensive and it takes space in the kitchen.
- it requires time. When looking at recipes on the internet, you need to warm the milk for a while, then let it cool down etc. It needs time!
- it requires having many individual small jars, that need to be cleaned and stored.
In this article I give you some solutions to these three problems:
- you do not need a yogurt maker, which by the way is just a big plastic box with a resistor to maintain temperature around 40°C. You will just need a way to keep your yogurts at a warm temperature for several hours. To do that I use a sous vide immersion simulator. What? You said no gadget!? No worries, you can also make yogurts without this device, I will explain you how to do that. I had this device in my kitchen for other recipes and I found I could also use it for yogurts making!
- no need to warm the milk, I will explain you why! Without that step it becomes really fast to make your own yogurt!
- as a container I only use big glass jars and that’s totally fine! Also, it helps keeping the yogurt warmer thanks to the intertia.
What is yogurt?
Before giving you the recipe, let’s first try to understand what is a yogurt. A yogurt is simply fermented milk thanks to non pathogenic bacteria that like warm environment.
In a previous article I was explaining the principle of acid coagulation of milk. If you let raw milk at room temperature for a few days, it will become firm, a bit like jelly, or… like yogurt! Bacteria present in the milk are eating the milk’s lactose, which increases the acidity of the milk and modifies the proteins. As a result, the proteins agglomerate and from this firm and jelly-like texture. When making yogurt, the same process takes place but with a specific type of bacteria. These bacteria like to be in a warm environment. That’s why they are called thermophile (that comes from greek and means “which likes warm”). These bacteria are present in raw milk. They happen to coagulate the milk very well!
To make yogurt it generally requires to use two main types of bacteria: Lactobacillus delbrueckii subsp. bulgaricus et Stretococcus thermophilus. These bacteria have been selected and isolated by humans for their good acidifying and milk thickening properties. Depending on the strains, they have more or less thickening effect1,2. However if you buy ferments or yogurt it is not possible to know which strain is resent. If you like more or less thicken yogurt you thus may have to make some experiments to find the right ferment.
Yogurt starter
To make yogurt for the first time, you need yogurt! Really?! In theory you can make you own starter from raw milk. But raw milk contains about 200 types of microorganisms and as explained earlier you would need to isolate 2 out of them. This is not as easy as it seems. So far I haven’t managed to obtain a good starter. But it is on my to-do list!
To start your first yogurt just buy a good yogurt, from a farm or at least made with organic milk and without any additive. Just take a tablespoon of this yogurt and you have your starter!
Recipe with sous vide immersion circulator
Ingredients
- 1L of pasteurized or raw milk (if it is raw, do a gentle pasteurization and let it cool down to ~40°C)
- ~1 tbsp of the previous batch of yogurt
Material
- a big pot
- sous vide immersion circulator
- glass jars that you can close hermetically
Prearation time
5 minutes then ~10-12h of waiting time. You can start the preparation before going to bed and the yogurt will be ready when you wake up!
Process
Durations are not strict. If your yogurt is firm after 5h then it’s fine, no need to wait longer. Take care of using well-cleaned material (use white vinegar, rinse with clear water and keep it dry in the open air). Wash your hands too!
-
Fill in the pot with warm water (no more than 40°C) and set up the immersion circulator device to 40°C for about 10 hours.
-
Mix the starter with the milk. Pour into the jars and close them. Place the jars in the pot. If the water covers the pots it is fine. Just make sure that the jars are not floating, they should not move.
-
~10 hours later the milk should be firm. Put the jars in the fridge. You can eat when it’s cold!
Recipe without sous vide immersion circulator
Ingredients
- 1L of pasteurized or raw milk (if it is raw, do a gentle pasteurization and let it cool down to ~40°C)
- ~1 tbsp of the previous batch of yogurt
Material
- a big pot
- a blanket or something equivalent to wrap the pot and keep it warm
- a thermometer
- glass jars that you can close hermetically
Durée de préparation
5 minutes puis ~10-12h d’attente. Vous pouvez démarrer la préparation avant de vous coucher et au réveil c’est prêt !
Process
Durations are not strict. If your yogurt is firm after 5h then it’s fine, no need to wait longer. Take care of using well-cleaned material (use white vinegar, rinse with clear water and keep it dry in the open air). Wash your hands too!
-
Fill in the pot with warm water (no more than 45°C):
-
Mix the starter with the milk. Pour into the jars and close them. Place the jars in the pot. If the water covers the pots it is fine. Just make sure that the jars are not floating, they should not move. Cover with the blanket to keep everything warm. The first time you can check the temperature from time to time to see if the temperature does not decrease too fast. Otherwise you may have to adjust the insulation.
-
~10 hours later the milk should be firm. Put the jars in the fridge. You can eat when it’s cold!
FAQ
Why most recipes on the internet mention to warm the milk?
Warming the milk helps degrade the proteins. Proteins are like long strings of molecules folded in balls. Heat helps unfolding these balls. Proteins can then link together and form some sort of network. This network then turns the liquid in something more jelly-like. As explained earlier, proteins degradation also happen because of acidity due to bacteria. Heating the milk is thus not essential to get a thick yogurt.
Why do some recipes mention to add milk powder or other setting agents?
They are added to thicken the yogurt. They allow to compensate weak ferments and also to create different types of textures. Just be aware that this is not needed to make a thick yogurt. Some people also heat the milk for a long time to evaporate a part of the water contained in the milk. But again, this is not essential (and it takes time!).
My yogurt is liquid, why?
There may be several reasons:
- you moved the yogurts while making them (yogurt is fragile)
- your starter is not in great shape. Change it or renew it.
- the temperature was not correctly maintained
There is some transparent liquid on top, what’s that?
This is called why. It is mainly water and proteins and it is very good! It can happen if the coagulation was too long. You can reduce the coagulation time if you don’t like that.
There are bubbles in my yogurt!
That’s a problem! Other bacteria have probably contaminated the milk. The milk also may have been too old (see below picture). Throw away that yogurt and start again!
 On the left and middle is a failed yogurt with bubbles. The milk was too old. The same fermet used with another fresher milk gave a successful yogurt (on the right).
How can I get a less acid yogurt?
The more you leave the bacteria at their comfort temperature, the more they proliferate and the more they will acidify the yofurt. If you like yogurt that is less acidic, you can vary the waiting time. Start from 5h, taste and see!
How long can I keep it?
Thanks to fermentation, yogurt can be kept much longer than milk. The lactic bacteria acidify the milk which prevents other bacteria to install and or proliferate. This is even amplified by refrigeration. In theory, a yogurt can be stored for about a month. In practice that can even be longer. If your yogurt has the same lactic taste, no weird smell and the texture is the same as before, it’s good to eat.
What if I want to take a break in yogurt making?
As explained earlier you can keep yogurt for quite a long time. However there are other ways to presever your ferments. You can either freeze them as ice cubes. Then you can use these ice cubes directly as starters. You can keep them for about a month in your freezer. After that time the bacteria may become damaged and less active.
Apparently it is also possible to dry some yogurt. You spread it and let it dry in a warm place (no more than 40°C). Then you can keep the resulting powder in the fridge. I never tried but that looks super interesting and a convenient way to preserve it.
References
[1] Analysis of the exopolysaccharides produced by Lactobacillus delbrueckii subsp. bulgaricus NCFB 2772 grown in continuous culture on glucose and fructose, Grobben et al., 1997
[2] Comparison of the thickening properties of four Lactobacillus delbrueckii subsp. bulgaricus strains and physicochemical characterization of their exopolysaccharides, Petry et al., 2003